How to Install a Basement Hatch Easy Light
Before ordering a hatch for tiles type Light Light (Revizio Loft), we recommend that you watch the overview videos of hatches of this design at the link
Installation and Maintenance Guide
of floor hatches for tiles type Light Light.
1. General Provisions
- Floor hatches type Light Light - are designed for horizontal installation with a cover on top.
- In the basic version, fasteners and (or) holes are NOT provided on floor hatches of our design.
- ALL additional elements of the hatch design to the basement are agreed upon and paid for by the Customer when placing an order.
- Our warranty obligations do not apply to gas springs.
- Please do not treat the rods of gas springs with products such as WD-40. This leads to the fact that the rubber seal inside the gas spring cup is destroyed and the spring "leaks".
- Install gas springs only with their rods to the floor hatch frame!
- Do not operate the floor hatch with gas springs connected before laying the floor covering.
Do not try to check the gas springs for compression manually. The minimum force of the gas springs we use is 600 Newton (approximately 60 kg).
If you really want to check the gas spring, then attach them to the hatch ONE AT A TIME and check.
If the weight of the hatch leaf with the glued floor covering is balanced by one gas spring, and there are two in the kit, then put one spring on the hatch and leave the second one in reserve!
Do not try to make the floor hatch leaf tear off by itself.
A necessary and sufficient condition for long and correct operation of the hatch is that the force to lift the hatch cover should be within 4-7 kg!
2. Installing the floor hatch.
Work sequence:
2.1. Install the hatch with DISCONNECTED gas springs (for correct and level installation of the hatch).
2.2. Carefully place the floor hatch in the opening.
2.3. Draw a marking line along three sides of the hatch frame that are turned outward.
2.4. Remove the hatch from the opening.
2.5. Cut a nest for the hatch around the opening along the marking line in a convenient way. The depth of the nest is 10 mm.
2.6. Place the hatch in the prepared place and, having adjusted its position in the horizontal and vertical planes, secure the hatch frame in the opening with temporary fasteners.
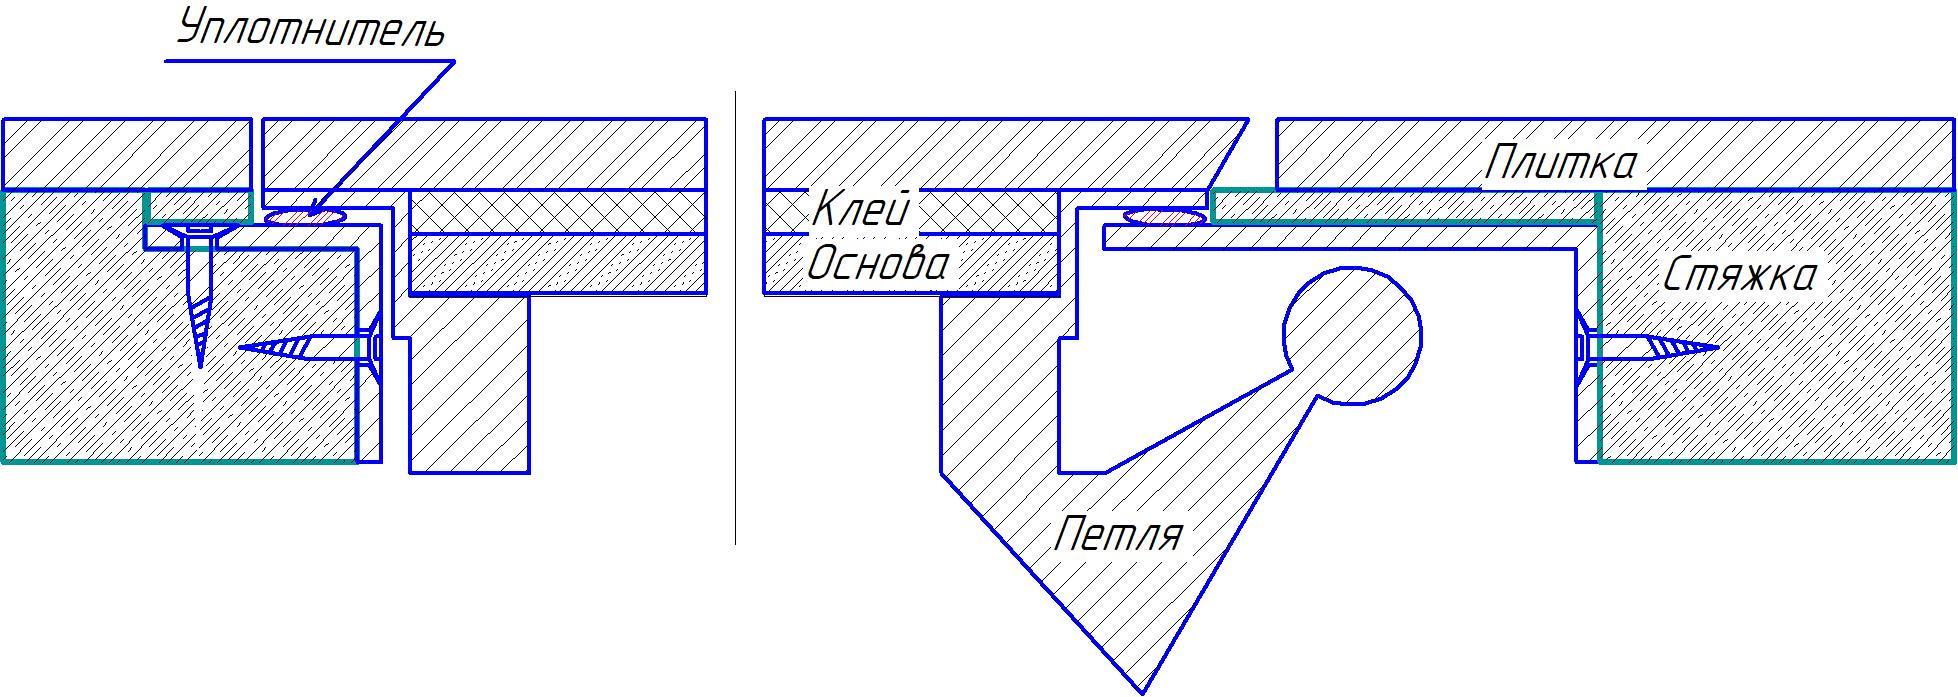
2.7. The goal of adjusting the hatch in the vertical plane is to ensure that the upper plane of the corner along the perimeter of the hatch leaf is 1-2 mm below the lower plane of the tile laid on the floor!
(For precise installation of the hatch in depth, it is necessary to lay pieces of sealing rubber between the frame and the leaf so that the leaf is raised on the rubber by 2-3 mm in the closed position of the leaf);
2.8. Drill holes in the horizontal shelves of the floor hatch frame for the mounting anchors with a countersunk head. For the countersunk head of the anchor, it is necessary to drill the edges of the mounting holes (it is necessary to prepare at least 3 such holes on one side);
2.9. Through these mounting holes, drill holes in the coupler for the mounting anchors with a countersunk head;
2.10. Screw the anchors into the prepared holes, thus securing the floor hatch frame in the nest;
(Do not overtighten the anchors, as this may lead to the hatch frame "twisting" if it does not fit tightly to the nest shelves!)
The anchor head should not protrude above the surface of the floor hatch frame shelf by more than 1-2 mm;
If the condition of the top layer of the screed allows, it is preferable to fasten the anchors through the vertical wall of the hatch frame in order to fix it more rigidly in the opening.
The upper edge of the floor hatch leaf should be 1-2 mm below the lower level of the tile glued to the floor. For precise installation of the hatch in depth, it is necessary to lay pieces of sealing rubber between the frame and the leaf.
3. Gluing the tile to the material of the floor hatch leaf.
The finishing material is glued to the hatch leaf, according to the drawing.
The gap between the tile on the leaf and the tile on the floor on the hinge side and on the opposite side from the hinge should be 5-6 mm (with a finishing material height of 15-20 mm). When increasing the thickness of the finishing material, also increase the inter-tile joint in the specified places.
3.1. The width of the gap on the hinge side should be selected as follows:


- glue a tile with an internal corner ground at 60 degrees to the hatch leaf, on the hinge side (see photo);
- opposite this tile, on the floor, attach a floor tile with temporary fasteners (the joint thickness is approximately 6 mm);
- try to open and close the hatch leaf;
- if the joint between the tiles is too wide, then move the floor tile closer to the tile on the leaf (make the joint narrower);
- if the tile on the door leaf catches on the floor tile, then move the floor tile (make the seam wider).
This will achieve the optimal seam width between the tile glued to the door leaf of the floor hatch on the hinge side and the floor tile glued to the floor.
- glue a tile with an internal corner ground at 60 degrees to the hatch leaf, on the hinge side (see photo);
- attach a floor tile to a temporary fastener opposite this tile on the floor (the seam thickness is approximately 6 mm);
- try opening and closing the hatch leaf;
- if the seam between the tiles is too wide, then move the floor tile closer to the tile on the leaf (make the seam narrower);
- if the tile on the leaf catches on the floor tile, then move the floor tile away (make the seam wider).
This will achieve the optimal seam width between the tile glued to the floor hatch leaf on the hinge side and the floor tile glued to the floor.
4. After sealing the seams, carefully clean the gap between the frame and the hatch leaf (to prevent them from sticking together).
To achieve the best heat and noise insulation and operational properties of the hatch, do not allow any hollow spaces between the hatch frame and the opening. They must be carefully sealed with a sealant such as "Mounting foam".
5. Glue a rubber seal under the visor of the sash along the perimeter.
6. Maintenance and preventive inspection.
It is recommended to open the hatch once a month to straighten and lubricate the gas springs from the inside.
Provided that the installation is correct, we provide a 60-month warranty on our products.
